Last Updated on 7 April 2025 by
How Do You Measure for a Korniche Roof Lantern?
To measure for a Korniche roof lantern, start by recording the kerb dimensions, ensuring you account for the waterproof membrane, and include a 12mm overhang to achieve a precise and seamless fit.
Installing a Korniche roof lantern can transform your home, filling it with natural light and enhancing its aesthetic appeal.
But achieving the perfect fit requires precision, and that starts with accurate measurements of the space where you’re planning to plant your roof lantern.
This guide combines practical advice with expert tips to ensure your measurements are spot-on, paving the way for a smooth installation.
No time to read? Why not jump ahead to the section you need…
- Why Accurate Roof Lantern Measurements Matter
- Measuring for a Korniche Roof Lantern
- Best Practices for Accurate Measurements
- Common Measurement Mistakes to Avoid
- Korniche Roof Lantern Dimensions
- Roof Lantern Fitting Sizes
- Preparing Your Roof Opening
- FAQs
Why Accurate Roof Lantern Measurements Matter
A well-measured roof opening is essential to prevent issues such as leaks, structural stress, and poor insulation.
Korniche roof lanterns are designed to fit your roof seamlessly when the measurements are precise and accurate, ensuring both aesthetic appeal and long-term functionality.
Measuring for a Korniche Roof Lantern
Before you begin measuring for a Korniche roof lantern, it’s handy to have these tools ready to hand:
- Tape Measure: This will give you precise measurements for the length and width.
- Spirit Level: Allows you to check the area you plan on putting your Korniche roof lantern is level.
- Pencil and Notepad: For recording dimensions.
- Ladder: To safely reach the roof and obtain the measurements.
With these tools at your disposal, you can start taking measurements for where you’re planning to place your roof lantern.
For the perfect fit it’s best to add 12mm to your width and length measurements to ensure you create the perfect overhang and fit.

Measuring for a perfect fit
Ensuring you have the perfect fit for your Korniche roof lantern is vital in getting the best performance and longevity from your purchase.
Let’s walk through the best way to go about making your Korniche roof lantern fit like a glove.
1. Measure the External Kerb Sizes
Start by determining the internal dimensions of the space you are planning to place your Korniche roof lantern in:
- Width and Length: Measure from one internal edge of the roof opening to the other.
- Take Multiple Measurements: Measure at different points to ensure consistency. Record the largest measurement to avoid ordering a lantern that’s too small.
Include Kerb Dimensions in the Overall Width
The kerb (or upstand) is crucial for fitting your roof lantern.
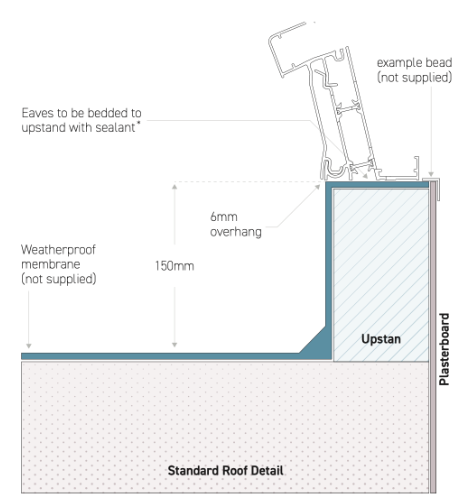
- Minimum Specifications: Ensure the kerb is at least 150mm high and 69mm wide, as per Korniche recommendations (Korniche Aluminium Roof…).
- Include the Membrane: Account for any roofing membrane covering the kerb in your measurements.
3. Add an Overhang
For a professional finish and to optimise your Korniche roof lanterns performance, we recommend adding a 6mm overhang to your roof lantern.
To do this you need to add 12mm to the width and length measurement you got from measuring the internal edge of the roof opening.

4. Ensure the Roof Opening is Square
A square opening ensures a snug fit:
- Measure Diagonally: Measure from one corner of the opening to the opposite corner on both sides.
- Check for Consistency: If the diagonal measurements are unequal, the opening isn’t square, and adjustments may be needed.
5. Consider the Roof Pitch (if applicable)
Korniche roof lanterns are designed for flat roofs so if there is a slight pitch on the roof it can impact the fit.
If your roof isn’t completely flat, consult a professional to determine any necessary adjustments that need to be made.
Best Practices for Accurate Measurements
When it comes to getting the most accurate measurements for your Korniche roof lantern, there’s a few best practices that you can follow
Measure Twice, Order Once
By double-checking your measurements you are able to ensure accuracy before ordering your roof lantern. Mistakes can lead to delays, additional costs, and installation challenges.
Follow Manufacturer Guidelines
Referring to Korniche’s aluminium roof lantern surveying guidelines when taking measurements can ensure your lantern fits as intended and performs optimally.
Plan for Installation
Consider how your measurements will align with installation requirements, such as sealing and drainage needs. Taking these into account now can save time and trouble later.
Common Measurement Mistakes to Avoid
Failing to Include Kerb Dimensions
Overlooking kerb height and width is a common mistake that can lead to an ill-fitting roof lantern. Including these dimensions in your calculations is a sure fire way to save any headaches later on down the line.
Overlooking Membrane Thickness
Roofing membranes add thickness to the kerb, which needs to be accounted for when measuring. Ignoring this can result in a lantern that doesn’t sit properly.
Assuming the Opening is Square
Don’t assume the roof opening is square—verify it with diagonal measurements. Even slight discrepancies can impact the roof lantern fit and alignment.
Korniche Roof Lantern Dimensions
Korniche roof lanterns come in a variety of stock sizes, ranging from 1000mm x 1000mm all the way up to 4000mm x 2500mm
Standard Sizes
Some of the most common stock sizes that people get Korniche roof lanterns in include:
- 1000mm x 1500mm
- 1500mm x 2500mm
- 2000mm x 3000mm
Custom Sizes
For unique projects, Korniche roof lanterns can be made to fit bespoke sizes. To order a custom size:
- Provide exact external kerb dimensions (including the membrane).
- Ensure the dimensions include the 12mm overhang.

Roof Lantern Fitting Sizes
Understanding the Kerb Requirements
The kerb (upstand) acts as the foundation for your roof lantern, so getting its dimensions right is essential:
The kerb should be at least 150mm high to meet Korniche’s specifications, while the width must be a minimum of 69mm to accommodate the lantern frame.
If you need some more information about the Kerb or upstand dimensions for your roof lantern, you can read all about roof lantern upstands in detail.
Preparing Your Roof Opening
Ensure the Kerb is Level
A level kerb is crucial for the roof lantern to sit securely. Use a spirit level to verify that all sides are even before installation begins.
Apply Weatherproof Membranes
Cover the kerb with a weatherproof membrane to prevent water ingress. Ensure the membrane is securely adhered and free from wrinkles or gaps.
Clear Obstructions
Remove any debris or structural elements that could interfere with the installation of the lantern frame or glazing panels.
Preparing for Drainage
To ensure proper drainage, apply a bed of silicone to the kerb before placing the ring beam on top. This creates a secure seal that prevents water from leaking through. Failing to seal this gap can result in pooling water and potential leaks, so it’s crucial to follow this step carefully.
Understand How to Measure for a Korniche Roof Lantern with GFD Homes Today!
By following this detailed guide, you’ll ensure your Korniche roof lantern fits perfectly and is ready for smooth installation.
If you need further information, why not give our expert team at GFD Homes a call on 01642 309 576, or book a visit to our Teesside showroom for a face-to-face conversation!
FAQs about Measuring for a Korniche Roof Lantern
How do I measure for a Korniche Roof Lantern?
To measure for a Korniche roof lantern, start by recording the kerb dimensions, ensuring you account for the waterproof membrane, and include a 12mm overhang to achieve a precise and seamless fit.
What are the standard dimensions for roof lanterns?
Korniche roof lanterns come in standard sizes such as 1000mm x 1500mm, 1500mm x 2500mm, and 2000mm x 3000mm. Custom sizes are also available for non-standard roof openings.
How Do I Account for Roofing Membranes When Measuring?
Include the thickness of the roofing membrane in your kerb measurements. This ensures the roof lantern frame fits securely over the kerb and aligns with the membrane for proper sealing.
Can I Install a Roof Lantern Myself?
While it’s possible that you could install a roof lantern yourself, we always recommend opting for professional installation. Accurate measurements, proper sealing and proper fitting are critical to prevent roof lantern leaks and structural issues.
